Saturday, July 30, 2016

Legendary website has been in form with new domain


Legendary website has been back again with the new domain.Earlier it has been already proved that it has been back with kat,am domain and how ever it has been again suspended again due to some reasons.Since i call it as the legendary website not only me but many call it as legendary website cause it is the main source for any type of data available in the tips of the fingers.

Earlier we have seeen the many posts and many news about the website and the owner of the website.There are many reasons for suspending the website but the main reasons for shut downing the website Piracy.Since it is the biggest crime but the kickass website has been the worlds leading website in providing the data as soon as possible.In this website large file sharing is done and much more reasons for sezing this website.

Finally it has been evolved out with the new proxy domain http://dxtorrent.com.This also didnt loose any data some data has been missing and that is negligible.Hence it has been providing the all the data and also the user login acces to their own authenticated users.Kikcass torrents has kicked the many disasters and evovlved out.

To go the website  click here

Sunday, July 24, 2016

Remove Bad Sector In Pendrive | “Do you want to scan and fix Removable Disk” Error In Windows


Bad sectors are an unavoidable part of our digital life. Many of us have become used to this kind of suddenly that arise every now and then. But, for the users, seeing alert messages of disk errors after connecting a pen drive would lead to a situation of panic. Our pen drives and hard drives store a small amount of data in various sectors. There are times when some of these sectors become unusable. Such sectors are known as bad sectors.

In this article, I will mention the steps required to repair bad sectors present in a pen drive or any mass storage media connected to a computer. The method will require the use of a machine running the Windows Operating System. There are two types of bad sectors:

Logical (Soft) Bad Sectors: Exist due to software problems. Can be repaired.
Physical (Hard) Bad Sectors: Exist if a physical damage occurs in the pen drive or storage media.
So, how to remove bad sectors in a pen drive? Here are some methods which would help you get off the situation:

Remove bad sectors using Windows Explorer

First and the foremost solution to the removal of bad sectors is the Windows Explorer. An easy to use interface would allow you to check your connected storage media for bad sectors and get rid of them.
Note: We’ve used Windows 8.1 to run the disk checking utility. The user interface for Windows 10 is similar but it may differ for Windows 7. Snapshots have been added for your convenience.
Follow these steps:
1. Connect your pen drive to your computer. Windows may automatically display a message “Do you want to scan and fix Removable Disk (F:)”.


2. You can also perform the repair process by opening My Computer or This PC.
3. Right Click on your pen drive and go to Properties.
4. Click the Tools tab on the top of the properties window.
5. Here, you’ll see the Error-Checking utility. Click Check Now and the disk checking process will commence.
Windows 7 Snapshot after clicking Check Now:
Note: Don’t forget to close all the applications accessing the pen drive.
6. The error checking process will take some moments to complete and will notify you of whether any errors exist on your pen drive or not. It might be possible that your pen drive doesn’t have any errors. You can still continue with the repair process if your pen drive isn’t working correctly.

7. If the disk checking utility finds any errors on your pen drive, it’ll give you two options. Schedule on next restart or Restart. Choose Restart if you want to start the repair process immediately, else, choose the other one. Don’t operate or turn off the computer while the repair is the progress.

Repair Bad Sector using CMD in Windows

If the GUI-based disk checking utility doesn’t work for you then you can head on to the command line interface in Windows. Check Disk is used to perform an error check operation on your connected storage media. To open CMD in administrator mode, Right Click on the Start button and click Command Prompt (Admin).

Use the following command to simply check if any errors exist on your storage media:

 chkdsk c:
Here, C is the drive letter assigned to your storage media. You need to write the appropriate drive letter assigned to your pen drive (for example, it’s F in my case). Open My Computer/This PC to see the correct drive letter.

To fix the errors present on the disk, type:
chkdsk /f c:
To find and remove bad sectors:
chkdsk /f /R C:
drive. Restart your computer after the repair process completes.
Here is a complete list of all the  chkdsk options provided by Microsoft.
The above methods will also work for internal drives, SD cards or MicroSD cards (connected using an adapter), and external hard drives.

Saturday, July 23, 2016

Legendary website has been back


The largest world legendary website has been back with the other domain.It also contain the complete database and also the user account data.The hosting information has been kept secret behind the walls of the cloudflare.

From the past few days many have you seen that the website has been blocked and the owner has been arrested bla bla...and today here is a new iteration has become the new era and poped  in the internet that the legendary website has came back with the new domain named Kat.am with the complete user data .

The homeland security department seized KAT’s domains. They also managed to arrest KAT founder Artem Vaulin aka Tirm with Facebook and Apple help. But, the world’s most loved torrent website came back.

The whole scenario resembles what we see in Indian daily soaps where characters come back from the dead again and again. Jon Snow fans will also find this analogy relatable. KAT.am is the new domain rooting for KickassTorrents’ rebirth. The website is “hosted on different cloud servers to prevent blockade, and the hosting information is well hidden behind Cloudflare,” the creators of KAT.am said in an email to The Verge.
Pirate websites coming back from the dead is not a surprise to our ears. The Pirate Bay did so in the past. It’s now running buttery smooth with all of its glory and its Originl domain.No matter how many times the security agencies and the copyright holders will try to put a bar on the pirate realm, it looks like it will come again, and again. Just like it has done so far.

However it never dies but changes its looks but the work is same to same
Note: The KAT.am website was working at the time of writing this post.It has been checked several times and posted.

Friday, July 22, 2016

How to use command prompt tricks for death attacks


 ping packet can also be malformed to perform denial of service attack by sending continuous ping packets to the target IP address. A continuous ping will cause buffer overflow at the target system and will cause the target system to crash.


If we look at the basic level, then a ping packet is generally of size 56 bytes or 84 bytes (including IP header as well). However, a ping packet can also be made as large as up to 65536 bytes.

Well, that’s the negative side of the ping packet. When we increase the size of the ping packet unnaturally, forming a malformed ping packet to attack a computer system, this type of attack is called “Ping of death” attack.

How Ping of Death attack works?

Not all computers can handle data larger than a fixed size. So, when a ping of death packet is sent from a source computer to a target machine, the ping packet gets fragmented into smaller groups of packets.
One fragment is of 8 octets size. When these packets reach the target computer, they arrive in fragments. So, the target computer reassembles the malformed packets which are received in chunks. But, the whole assembled packet causes buffer overflow at the target computer.
This buffer flow often causes the system crash making the system more vulnerable to attack.
Once the system becomes more vulnerable to attack, it allows more attacks like the injection of a trojan horse on the target machine.

A simple tutorial on how to perform DoS attack using ping of death using CMD:

Disclaimer: This is just for educational purposes. It’s nothing great but you can use it to learn.
Here are the steps:
  • Open Notepad
  • Copy the following text on the notepad
:loop
ping -l 65500 -w 1 -n 1
goto :loop
In the above command, replace with an IP address.
  • Save the Notepad with any name. Let’s say dos.txt
  • Right click on the dos.txt and click on rename.
  • Change the extension from .txt to .bat
  • So, now the file name should be dos.bat
  • Double click on it and you will see a command prompt running with a lot of pings.
Note: This command might not work on some systems.

Wednesday, July 20, 2016

How to recover files from corrupted USB drives


There are numerous reasons that lead to data corruption, due to viruses or if the drive is unmounted improperly from the port. Therefore, we are going to share two easiest methods that will help you to recover files from Corrupted USB drive. Go through the post to know about it.

The best way to recover data from corrupted storage device has been stated below. Today we mostly share our files through USB and some storage drives, but due to some viruses or if the drive is unmounted improperly from the port then it can lead to data corruption and they stop working properly. And data in them can  be inaccessible. So for this, we have a method to recover files from this corrupted drive. You just have to follow simple guide to recover all your files from any corrupted drive.

How To Recover Files From Corrupted USB Drive

The method is very simple and easy and depends on a cool recovery CMD trick and on a recovery software that will let you recover all files easily from your corrupted USB drive where you are unable to access files. Just follow some simple steps below to proceed.

Recover All Files From Corrupted Storage Device Using CMD:

Step 1. First of all Insert your drive in computer and press Windows button and type cmd. Now right click on Command Prompt and select Run as admin.
Step 2. Now there type Chkdsk H: /f where “H” is the drive letter and which can be different on your computer which you can check in Computer.

Step 3. Now files and folders verifying process will start and you can see the process in percents there. If you receive the error that your drive is not windows XP drive then simply enter Y there. When it is done, you should see this in your command window.
Step 4. In the above-mentioned screenshot, my USB drive is working fine and it has no corruption, in case if you USB  drive was corrupted then you will get the recovered data stored in the directory Lost.dir in your USB drives.
If you see no items on your USB drive then simply type “.” (dot without quotes)in a search box top right corner and hit enter.

#2 Using EaseUS Data Recovery:

EaseUS Data Recovery Wizard Free Edition is the card recovery freeware for memory card used by digital camera. It can effectively recover lost, deleted, corrupted or formatted files from various memory cards.
Step 1. First of all, download and install the tool EaseUS Data Recovery wizard on your windows computer, and launch it. You need to select the file types that you want to recover and click “Next”

Step 2. Now you need to select your USB drive and need to hit the “Scan” button, EaseUS data recovery will quickly scan for the lost files.

Step 3. Once the scan gets completed, you can preview all the recoverable files. You just need to click on “Recover” button to get your lost files back.
So above is all about Recover Files From Corrupted USB Drive. With these two mentioned methods, you can easily recover all your files from a corrupted USB and any storage drives very easily. Also, all other USB errors will get fixed with this trick. Hope you like the article, do share it with others too. Leave a comment below if you have any related queries with this.

Monday, July 18, 2016


Airtel is the widest network in india providing good network service as an operator overall the indian country.As we all know that the data packs and all the tarrifs has been gradually increased providing with the low amount of data which may not be sufficient to a social networking people and simply will complete data.In accordance to it they are providing with less validity time.As a result using data packs has become expensive .The people who are affording this airtel network keeping in sense it provides good network,for all such people here is a good news for all the airtel users.

For all the airtel prepaid users here is a good news,Airtel network is providing 67% of extra data on all the 2g,3g,4g data packs.In Andhra Pradesh & Telengana states at present airtel network is providing 3GB data with the recharge of Rs.655 and now it has been extended to 5GB data with the same recharge of Rs.655.Within small amount if data packs also it is providing this facility like with the recharge of Rs.25 it is providing 145MB instead of 100 MB,with Rs.145 it is providing 580 Mb instead of 440MB.All the changed data packs and Tarrifs  has been came into service and existance.
Other major network Idea announced that it is  providing extra data ie. 45% for all its 2g,3g,4g users.

Saturday, July 16, 2016

Different uses of a WI-FI Router

Wifi(wireless-Feidility):It is well known even by  small school kid now-a-days bcoz wifi has become a part in our day to day life.People can live without food,shelter are any else but cant live without Internet wifi.It has become the essential need in this generation.

IN earlier days there were only  few essential needs that was Food,shelter,clothes..etc i too dont know exactly just dont mind it.But now "Wifi with internet" that too with high speed has become the most essential for to people

Wifi has been using in homes,offices,schools colleges restaurents hotels even in some countries government has been providing the facility of free Wifi hubs and wifi spots in whole streets with  a high speed.It has been using in home appliances too for remote controlling and ON &  OFF operations of the home appliances and also for security reasons. So such important and essential Wifi routers are used only for internet.But with such Essential wifi routers or modems there are many uses.Lets see the most useful Uses of the wifi routers.

Usb Port.


If you observe,the latest wifi routers has the facility of the USB port which it has been working with the FTP(FIile Transfer Protocol).If you connect any data containing pendrive or any other external hard disk to the usb port of the wifi router,pepople who are connected to this network can browse the data of the hard disk.You need not to connect always to your pc any other device to acces the data.Multiple people can acces the data if all the people connect to the same network where such hard disk or anyother device connected to router.It reduces the time wastage and damaging of the hard disk too.

Network Drive


 It is also in the same theme as earlier said in case if the USB port of the wifi router.Your personal data such as photos,vedios,films etc and such other data are stores in  such central storage devices,you can acces this data  any where in the world through  a device named NAS(Network Assisted Storage).These devices are available with some offers in some brands like Segate,Wd my cloud with the storage capacity from 2TB to 4TB.Some devices can be connected to the wifi network and some are available with the facility to connect with the Ethernet and also with the usb port.Connect to this Your NAS device and you can acces your data anywhere in this world.Data Transfer speed depends upon the network availble to you and the network you connected basing upon the upload and download speed.Along with this device you also get the App & PC  software where you can manage the data in NAS through your device where you are staying.

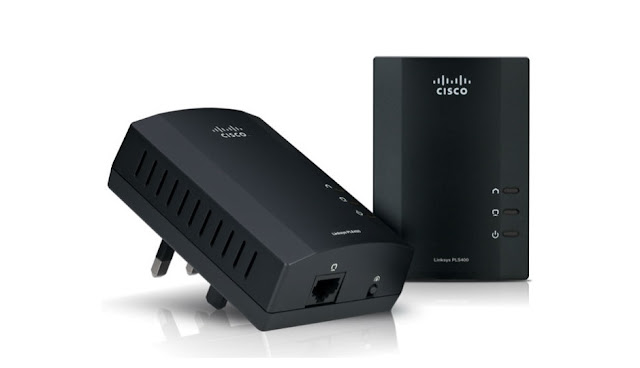
Powerline


Do you have any old western digital or Lomega drive or any other brand media player device which suports the ethernet connection??????
Generally these devices doesn't come with the facility of the wifi conection and these are very difficult to the ethernet connection.so in order to overcome this problem , powerline will be very useful.one end  connect to the wifi router and the other end connect to the ehternet connection and the outdated internet connection can be obtained without any internet which is similiar to the virtual internet.

Wifi Range extenders


You are having all good wifi router high speed internet connection but due to your home infrastructure and obstruction of walls and some other problems your wifi signals are being blocked.For example ,if your wifi router is placed in the hall of your home and you do not get the strong signal of the wifi to your room in the upper stair due to your infrastructure and other problems you get very weak signal.In such conditions Repeaters and Range extenders can be used where it produces very strong signal to longer distances by cathcing the signal where it is weak and produces very strong signal.From basic these are available from Rs.1000 starting range and are available upto high end range.These are very useful to very large and big homes without purchasing many more routers.

Home survillence


Security problem has become the major problem now a days.If you are being worried about the  security problem at your home no problem .You can monitor your home smartly with this technology.keep your wifi network active purchase a home survillence camera and connect it to the active wifi network.Now you can monitor all the security threats  without knowing to the knowledge of the people who are staying in home through your laptop or a smarthphone through a radio type transmission.These best survillence cameras are available from the price of 3 thousand.

Remote controll


Even though if your smart mobiles doesn't support the infrared ,through your wifi network you can use your smart mobile  as the universal remote to control devices.For this the device which you decide to control should have the wifi support and both the devices should be connected to the same network.For  all the android and Ios users some apps are available in App stores for remote controlling.Unfortunately,Only smart tv's have the wifi support and facility.

Printing

Generally you know about the ehternet connected printers.If you are doing more printing work then this wifi printer is the best choice.People who takes prints with the multiple devices,these devices can be connected to the same wifi network and this makes printing easy and this printing can be done through your smartphone and laptops..etc

Friday, July 15, 2016

Few tips to speed up your google chrome browser

Google chrome is well known browser and most of the Netizens(who uses the internet most ) uses this browser.It is a very good serch engine where it has been upgrading with all new extensions as well physical look too.

But now a days most people are being complained about the sudden closure of the browser slow running of the browser,being hang up for few seconds.There are many reasons for all these problems like computer specifications,ram..etc.

so inoreder to acoid such problems and to use efffectively the google chrome broswer with the gadgets you have i have few tips which help you in speeding up the browser as well as optimization too.So what are you waiting for here are the few simple tips follow it and use it.

1.Remove excess web apps.

There are many web apps available now ,but all these web apps run with the help of java,html..etc other codings.But the web apps now available are having more reliable graphics which needs more memory for graphics and RAM too as a result it reduces the Ram performance which finally leads to slow down of your lap, pc ,tab,smartphone whatever it may be.So remove the excess the web apps which you use rarely.If you dont use any web app i sugest you to remove it .

To remove unnecessary web apps:
1. Type “chrome://apps” in your Chrome’s address bar or click Apps on the Bookmarks bar.
2. Right-click the app you want to remove, select Remove from Chrome…, and click the Remove button to confirm the removal.

2.Disable unsued extensions

Extensions are considered as most useful in proper and effective using of browser but in real usage these extensions run in background which consumes internet day and slow downs your webpages which you browse.

To disable extensions:
1. Type “chrome://extensions” in your Chrome’s location bar. Otherwise, you can go to Chrome’s Options > More tools > Extensions.
2. Untick the Enabled to the extensions you want to disable, or click the Trash icon to delete the extension.

3.Disable uncessary  plugins

Like wise earlier said google browser comes with preinstalled plugins like Pdf compatibility view,google docs,sheets etc these also completely eat your system memory and network source.

To disable plugins:
1. Type “chrome://plugins” in your Chrome’s address bar.
2. Click Disable to disable the plugin you no longer need.

4. Enable Prefetch Resources

Google Chrome comes with many smart features such as network prediction, resource preloader, spelling correction, etc. Resource pre-fetcher or preloader offers intellectual suggestions about the pages or links the user is most probably to open next, loading those pages/links in the background before you actually open them.
To enable the prefetch feature in Chrome browser:
1. Head over to Chrome’s Options > Settings > Show advanced settings…
2. Check the “Prefetch resources to load pages more quickly” option.

5. Experimental Canvas Features

Experimental Canvas Features allow the Chrome to make use of opaque canvases to increase the loading times and improve performance.It Is up to you weather to use it r not but surely there will be atleast some fastness in browser.
To enable experimental canvas features:
1. Go to “chrome://flags/#enable-experimental-canvas-features.
2. Click on Enable and then Relaunch Now button.
6. Fast Tab/Window Close
The Fast Tab/Window Close option tries the response time of the browser when a user tries to close tabs or windows. Enabling this feature runs a tab’s onUnload.js handler autonomously of the graphical interface and speeds up the closing process.
To enable fast tab/window close feature:
1. Type “chrome://flags/#enable-fast-unload” in the address bar.
2. Click on Enable and then Relaunch Now button.
7. Scroll Prediction
Scroll Prediction feature tells the Chrome browser to foresee the finger’s future position during scrolls allowing the engine to render the frame before the page is scrolled again.It helps in flexibility of mouse pads in lap.
To enable Scroll Prediction:
1. Type “chrome://flags/#enable-scroll-prediction” in the location bar.
2. Click on Enable and then Relaunch Now.
8. Maximum Tiles
Maximum Tiles refers to the tiles for interest area. Increasing the maximum number of tiles allows Chrome to show more tiles based on your interests or browsing history, which lets you to quickly open a new website from the interest area.The people who opens numerous tabs and uses,to such people it helps a lot in perfomace .
To increase the number Maximum Tiles:
1. Go to “chrome://flags/#max-tiles-for-interest-area” in your browser.
2. Select 512 from the dropdown. Click Relaunch Now.
9. Raster Threads
Raster Threads are responsible for rendering images in Chrome. Increasing the number of raster threads enhances the image rendering time, and thus impacts page loading time and displays images quickly .
To increase the number of raster threads:
1. Open “chrome://flags/#num-raster-threads” in Chrome.
2. Choose 4 from the dropdown menu and click Relaunch Now.
10. Answers in Suggest
The “Answers in Suggest” feature allows Chrome to show responses to certain kind of queries (mostly questions) directly in the Omnibox’s suggestion list. You will no longer have to wait for the page to load to see answers for your queries, once you enable this feature.
To enable Answers in Suggest:
1. Type “chrome://flags/#answers-in-suggest” in the location bar.
2. Choose Enabled from the dropdown. Click Relaunch Now button.
11. Simple Cache for HTTP
Simple Cache is the new caching device for Google Chrome. Depending on the filesystem for space allocation, it works better than the old caching system.
To enable Simple Cache:
1. Go to “chrome://flags/#enable-simple-cache-backend” in your browser.
2. Select Enabled from the dropdown. Click Relaunch Now button.


====>Hope it helps 
If any queries and suggestions kindly mention it below comment box
-----Thank You----- :)

Thursday, July 14, 2016

Google Launches Android Skill And Certification Programme To Train 2 Million Android Developers.


If you are an Indian, you could soon join Google for Android skill and certification course. Search giant Google is now making path in all Indian  universities with its “Android skilling and certification” programme in an effort to boost government’s Skill India initiative.
The programme, which was launched in the capital on Monday aims to train two million Android developers from India by offering a slew of initiatives to train and certify talented students and developers in Android development in the next three years.
In order to make its Android app development training programme available in 31 Indian universities — both public and private, the tech giant has partnered with the National Skill Development Corporation (NSDC) and the National Programme on Technology Enhanced Learning (NPTEL).
“With nearly four million developers, India is expected to have [the]largest developer population globally by 2018. But today, only 25 percent of them are building for mobile,” Caesar Sengupta, Vice President (Product Management) at Google, told reporters in New Delhi.
“The aim is to help make India the global leader in mobile app development” he added. India has about 1 million developers building applications for the Android platform. Google’s Play Store has over a million applications, and less than four percent of the top 1000 applications come from India.
Google also launched an instructor-led training programme on Android fundamentals to provide in-person training to students in universities.In addition to NSDC institutes. The course will be available free of charge on NTPEL (an initiative of IITs and IISc) as part of its online “Mobile Computing” course, starting from July 18.
“We are hoping to get in about 2,000 different universities, training about 4,000 faculty to reach in excess of 250,000 students in these universities every year,” said Lubbers.
Google has tied up with training partners like Edureka, Koenig, Manipal Global, Simplilearn, Udacity and UpGrad who will operate as authorised Android training partners in India to help Google train the trainers and update Android courseware to prepare students for Android certification.
Google also announced the launch of its globally recognised job-oriented “Associate Android Developer Certification” exam that will help candidates get an entry-level Android developer job.
After training, the aspiring candidates can log on to the Google Developer training website and take the certification exam priced at Rs. 6,500.
“We introduced the Android Nanodegree programme in India last year with Udacity and today, we have over 11,500 students in India enrolling every month in our courses,” said Lubbers.
Google will also open-source all Android Developer Fundamentals practical and courseware and make these available to everyone for free.